DocsGPT Settings
DocsGPT is highly configurable, allowing you to tailor it to your specific needs and preferences. You can control various aspects of the application, from choosing the Large Language Model (LLM) provider to selecting embedding models and vector stores.
This document will guide you through the basic settings you can configure in DocsGPT. These settings determine how DocsGPT interacts with LLMs and processes your data.
Configuration Methods
There are two primary ways to configure DocsGPT settings:
1. Configuration via .env file (Recommended)
The easiest and recommended way to configure basic settings is by using a .env file. This file should be located in the root directory of your DocsGPT project (the same directory where setup.sh is located).
Example .env file structure:
LLM_NAME=openai
API_KEY=YOUR_OPENAI_API_KEY
MODEL_NAME=gpt-4o
2. Configuration via settings.py file (Advanced)
For more advanced configurations or if you prefer to manage settings directly in code, you can modify the settings.py file. This file is located in the application/core directory of your DocsGPT project.
While modifying settings.py offers more flexibility, it's generally recommended to use the .env file for basic settings and reserve settings.py for more complex adjustments or when you need to configure settings programmatically.
Location of settings.py: application/core/settings.py
Basic Settings Explained
Here are some of the most fundamental settings you'll likely want to configure:
-
LLM_NAME: This setting determines which Large Language Model (LLM) provider DocsGPT will use. It tells DocsGPT which API to interact with.- Common values:
docsgpt: Use the DocsGPT Public API Endpoint (simple and free, as offered insetup.shoption 1).openai: Use OpenAI's API (requires an API key).google: Use Google's Vertex AI or Gemini models.anthropic: Use Anthropic's Claude models.groq: Use Groq's models.huggingface: Use HuggingFace Inference API.azure_openai: Use Azure OpenAI Service.openai(when using local inference engines like Ollama, Llama.cpp, TGI, etc.): This signals DocsGPT to use an OpenAI-compatible API format, even if the actual LLM is running locally.
- Common values:
-
MODEL_NAME: Specifies the specific model to use from the chosen LLM provider. The available models depend on theLLM_NAMEyou've selected.- Examples:
- For
LLM_NAME=openai:gpt-4o - For
LLM_NAME=google:gemini-2.0-flash - For local models (e.g., Ollama):
llama3.2:1b(or any model name available in your setup).
- For
- Examples:
-
EMBEDDINGS_NAME: This setting defines which embedding model DocsGPT will use to generate vector embeddings for your documents. Embeddings are numerical representations of text that allow DocsGPT to understand the semantic meaning of your documents for efficient search and retrieval.- Default value:
huggingface_sentence-transformers/all-mpnet-base-v2(a good general-purpose embedding model). - Other options: You can explore other embedding models from Hugging Face Sentence Transformers or other providers if needed.
- Default value:
-
API_KEY: Required for most cloud-based LLM providers. This is your authentication key to access the LLM provider's API. You'll need to obtain this key from your chosen provider's platform. -
OPENAI_BASE_URL: Specifically used whenLLM_NAMEis set toopenaibut you are connecting to a local inference engine (like Ollama, Llama.cpp, etc.) that exposes an OpenAI-compatible API. This setting tells DocsGPT where to find your local LLM server.
Configuration Examples
Let's look at some concrete examples of how to configure these settings in your .env file.
Example for Cloud API Provider (OpenAI)
To use OpenAI's gpt-4o model, you would configure your .env file like this:
LLM_NAME=openai
API_KEY=YOUR_OPENAI_API_KEY  # Replace with your actual OpenAI API key
MODEL_NAME=gpt-4o
Make sure to replace YOUR_OPENAI_API_KEY with your actual OpenAI API key.
Example for Local Deployment
To use a local Ollama server with the llama3.2:1b model, you would configure your .env file like this:
LLM_NAME=openai # Using OpenAI compatible API format for local models
API_KEY=None      # API Key is not needed for local Ollama
MODEL_NAME=llama3.2:1b
OPENAI_BASE_URL=http://host.docker.internal:11434/v1 # Default Ollama API URL within Docker
EMBEDDINGS_NAME=huggingface_sentence-transformers/all-mpnet-base-v2 # You can also run embeddings locally if needed
In this case, even though you are using Ollama locally, LLM_NAME is set to openai because Ollama (and many other local inference engines) are designed to be API-compatible with OpenAI. OPENAI_BASE_URL points DocsGPT to the local Ollama server.
Authentication Settings
DocsGPT includes a JWT (JSON Web Token) based authentication feature for managing sessions or securing local deployments while allowing access.
-
AUTH_TYPE: This setting in your.envfile orsettings.pydetermines the authentication method.- Possible values:
None(or not set): No authentication is used.simple_jwt: A single, long-lived JWT token is generated and used for all authenticated requests. This is useful for securing a local deployment with a shared secret.session_jwt: Unique JWT tokens are generated for sessions, typically for individual users or temporary access.
- If
AUTH_TYPEis set tosimple_jwtorsession_jwt, then aJWT_SECRET_KEYis required.
- Possible values:
-
JWT_SECRET_KEY: This is a crucial secret key used to sign and verify JWTs.- It can be set directly in your
.envfile orsettings.py. - Automatic Key Generation: If
AUTH_TYPEissimple_jwtorsession_jwtandJWT_SECRET_KEYis not set in your environment variables orsettings.py, DocsGPT will attempt to:- Read the key from a file named
.jwt_secret_keyin the project's root directory. - If the file doesn't exist, it will generate a new 32-byte random key, save it to
.jwt_secret_key, and use it for the session. This ensures that the key persists across application restarts.
- Read the key from a file named
- Security Note: It's vital to keep this key secure. If you set it manually, choose a strong, random string.
- It can be set directly in your
How it works:
- When
AUTH_TYPEis set tosimple_jwt, a token is generated at startup (if not already present or configured) and printed to the console. This token should be included in theAuthorizationheader of your API requests as a Bearer token (e.g.,Authorization: Bearer YOUR_SIMPLE_JWT_TOKEN). - When
AUTH_TYPEis set tosession_jwt:- Clients can request a new token from the
/api/generate_tokenendpoint. - This token should then be included in the
Authorizationheader for subsequent requests.
- Clients can request a new token from the
- The backend verifies the JWT token provided in the
Authorizationheader for protected routes. - The
/api/configendpoint can be used to check the currentauth_typeand whether authentication is required.
Frontend Token Input for simple_jwt:
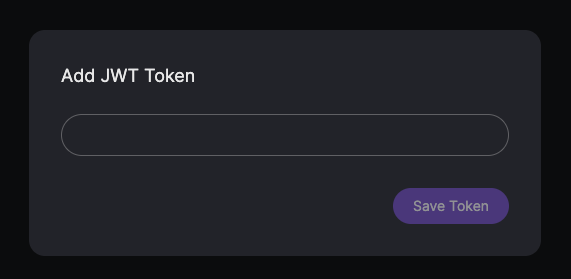
If you have configured AUTH_TYPE=simple_jwt, the DocsGPT frontend will prompt you to enter the JWT token if it's not already set or is invalid. You'll need to paste the SIMPLE_JWT_TOKEN (which is printed to your console when the backend starts) into this field to access the application.
Exploring More Settings
These are just the basic settings to get you started. The settings.py file contains many more advanced options that you can explore to further customize DocsGPT, such as:
- Vector store configuration (
VECTOR_STORE, Qdrant, Milvus, LanceDB settings) - Retriever settings (
RETRIEVERS_ENABLED) - Cache settings (
CACHE_REDIS_URL) - And many more!
For a complete list of available settings and their descriptions, refer to the settings.py file in application/core. Remember to restart your Docker containers after making changes to your .env file or settings.py for the changes to take effect.